 Mohs Micrographic Surgery Section of Specimens Using Cryostat, Stain, and Immunostain
Introduction
The key advantages of Mohs micrographic surgery (MMS) include precise microscopic control of tumor margins through specialized tissue processing techniques and the conservation of healthy tissue.[1] Please see StatPearls' companion resource, "Mohs Micrographic Surgery," for more information. A complete margin assessment requires high-quality frozen sections free from processing errors that could impede the surgeon's ability to accurately examine the tumor. Inadequate techniques may result in improper staining, misorientation of margins, misinterpretation of tumor margins, and loss of critical tumor characteristics.[1][2] Ultimately, these issues can lead to patient harm, suboptimal postoperative management, increased risk of disease recurrence, and higher costs.[3][4]
The technique for creating frozen sections and staining (including immunostaining) in MMS is similar to other forms of pathological sectioning and staining. However, Mohs surgeons and histology technicians use various methods for processing.[1][2] The tissue is prepared to allow for the assessment of 100% of the peripheral and deep margins in a single section. This is accomplished by manipulating the excised specimen to ensure that the peripheral and deep margins lie in the same plane, mounting the specimen on a chuck for sectioning, and using a cryostat to freeze the tissue and cut frozen sections with a microtome blade.[1]
Staining is performed after the specimen is cut on the microtome and transferred to a glass slide. Hematoxylin and eosin (H&E) staining is the most commonly used method in MMS.[1] Toluidine blue is used less frequently and is primarily applied when treating basal cell carcinomas (BCCs).[1] Immunohistochemistry is mainly utilized for melanomas, with the melanoma antigen recognized by T cells (MART-1) stain being the most common in MMS. Other immunohistochemistry stains for melanoma include SOX10, PRAME, HMB-45, MEL-5, and S100.[1][5][6] While immunostaining with cytokeratins can be helpful for detecting BCCs and squamous cell carcinomas (SCCs), few surgeons use this method due to the increased time and cost involved.[1] Reports have indicated that cytokeratin stains can be useful for confirming perineural invasion in SCCs and BCCs.[7]
When interpreting slides, surgeons should note any changes in slide quality resulting from processing errors and devise strategies to address these issues. This plan must be communicated to the entire team, particularly the histology technicians. Common findings associated with processing errors include tears or holes in tissue sections, excessive or minimal staining, bubbles, and water beads.[1][2] Prompt recognition of these issues is crucial, as it enables the team to identify the most appropriate troubleshooting techniques to resolve the processing errors.
Indications
Register For Free And Read The Full Article
 Search engine and full access to all medical articles
- 10 free questions in your specialty
- Free CME/CE Activities
- Free daily question in your email
- Save favorite articles to your dashboard
- Emails offering discounts
Learn more about a Subscription to StatPearls Point-of-Care
Indications
The Mohs appropriate use criteria (AUC) guide physicians in determining whether MMS is suitable for a specific cutaneous malignancy. The AUC generates a score (with a maximum of 9 points) based on tumor and patient characteristics, including lesion size, body location, whether the lesion is primary or recurrent, immune status, and histological features. MMS is considered appropriate if the score falls between 7 and 9. Conditions potentially amenable to Mohs surgery include, but are not limited to, BCC, SCC, atypical fibroxanthoma, melanoma, sebaceous carcinoma, and dermatofibrosarcoma protuberans. Additional indications for MMS may also be informed by other systems, such as the National Comprehensive Cancer Network guidelines for each tumor type. Please see StatPearls' companion resources, "Mohs Micrographic Surgery" and "Mohs Micrographic Surgery Appropriate Use Criteria AUC Guidelines," for more information.
Frozen sectioning is indicated when rapid diagnosis or intraoperative assessment of margins is essential. In MMS, this type of tissue processing enables the surgeon to accurately evaluate the entire surgical margin and make same-day clinical decisions based on histological findings.[1][2] Conversely, frozen sectioning is not recommended if diagnosis and assessment have no immediate implications for decision-making.
Staining with H&E or toluidine blue is essential for identifying cell types and key structures, such as nuclei, nerves, stroma, and adnexa. H&E is the most commonly used stain for various cutaneous malignancies.[1] Toluidine blue is primarily utilized in the treatment of BCCs, as it stains the mucinous stroma a reddish-purple color.[1] For melanoma treatment, melanocyte immunostains such as MART-1 are indicated.[1][5]
Equipment
Essential tools and equipment for preparing and analyzing specimens for MMS include:
- Scalpel handle with 15 blade
- Gloves
- Tissue forceps
- Petri dish
- Mohs map
- Patient labels
- Nonadherent gauze (preferred)
- Tissue marking ink/dye (colors such as blue, black, red, green, and yellow may be used)
- Microscope slides and cover slips
- Liquid nitrogen or other cryogen spray
- Embedding medium
- Mounting medium
- Cryostat chuck
- Cryostat machine
- Microtome blade
- Camel hair paintbrush
- Stains or chemicals (varies by staining technique; examples include fixative, H&E, 95% ethyl alcohol, 100% ethyl alcohol, distilled water, bluing agent, acid alcohol, clearing agent, toluidine blue, and MART-1)
- Manual or automated staining reservoir with cover and fume hood
- Microscope
- Histobath (optional)
- Person protective equipment (PPE)
- Lab safety equipment
- Material Safety Data Sheets
- Flammable liquid storage cabinet
Personnel
Personnel involved in preparing and analyzing MMS specimens include:
- Mohs surgeon
- Histology technician
- Surgical technician
- Medical assistant
- Medical student, resident, and/or fellow
Technique or Treatment
The steps for preparing tissue in MMS for frozen sectioning and staining are mentioned below.
Orientation and Tumor Debulking
Before the procedure, the Mohs surgeon marks the tumor to be excised and uses a scalpel to create small superficial incisions for orientation, typically at the 12-o'clock position (although additional areas may be marked).[2] Please see StatPearls' companion resource, "Mohs Micrographic Surgery Mapping Techniques," for more information.
After local anesthesia is administered, the tumor can be debulked—either before or after the main excision. Debulking is particularly helpful for large, bulky tumors, as the mass can impede specimen manipulation, making it difficult to position the peripheral and deep margins in a single plane. Common debulking techniques include curettage and sharp dissection with a scalpel.[1] Although curettage is effective, it can result in larger and deeper defects and may introduce floaters (ie, tissue or tumor debris).[1][2] The advantage of sharp debulking is that it preserves the integrity of the specimen, allowing for vertical sectioning to enable a more detailed examination of tumor characteristics.[1]
Tumor Removal
The tumor is removed around and deep into the debulked area. To facilitate embedding, the scalpel blade can be angled at approximately 45 degrees to create a beveled edge.[1][2] This edge can be more easily manipulated to lie flat, allowing the peripheral margin (epidermis and dermis) to align with the deep margin. However, the bevel angle must not be too low or high. Angles below 30 degrees increase the risk of cutting into the tumor, potentially leading to positive tumor margins.[2] Conversely, angles above 45 degrees may hinder tissue flattening, leading to the loss of epidermal and dermal margins during cryosectioning.[2]
Another important tip is to ensure the Mohs layer has a uniform thickness throughout the specimen, as uneven layers can cause rips and tears in the epidermis and dermis.[1] When excising Mohs layers that involve skin and cartilage, removing an additional 1–2 mm of skin and using a flatter 30-degree bevel is recommended.[8] This approach helps account for the contraction of skin and other tissues upon removal, while cartilage remains inelastic and does not contract, making it challenging to flatten specimens.[1][8] After removing the tumor, it is transferred to a piece of gauze (preferably nonstick) or thick filter paper in a labeled petri dish. A mark at the 12-o'clock position is typically made on the gauze or paper with a pen to maintain orientation. Importantly, it is essential to keep the cartilage moist before processing, as it can desiccate and become more difficult to manipulate.[1]
Sectioning, Mapping, and Inking
The removed specimen can be kept as a single piece or cut into multiple sections (2 or more) using a 15-blade scalpel. Smaller specimens can usually be maintained whole, while larger specimens may need to be divided into smaller pieces for easier manipulation, improved processing, and proper fitting on the glass slide.[1][2] The advantages of keeping sections as whole pieces include fewer cuts, reduced processing time, lower costs, a simplified mapping process, and a decreased chance of errors from mixing up sections.[1][2] Another potential drawback of having multiple sections is the increased likelihood of folding at the epidermal edges during processing.[2]
The surgeon then hand-draws a detailed map of the specimen on paper, inking the tissue to maintain orientation for analyzing the specimen microscopically. Many variations in inking techniques exist. When processing a whole specimen as a single section, the surgeon typically inks the 12-, 3-, 6-, and 9-o'clock positions in different colors.[1][2] For instance, some surgeons use blue for 12-o'clock, red for 3-o'clock, green for 6-o'clock, and black for 9-o'clock.[1] A simple way to remember the color coding is that blue points toward the sky, green points toward the grass or ground, and red has 3 letters. Divided specimens are inked along the adjacent edges with different colors.[1] The surgeon typically uses symbols such as dashes, crosses, dots, and "x" to represent the corresponding colors on the Mohs map. Please see StatPearls' companion resource, "Mohs Micrographic Surgery Mapping Techniques," for more information.
Relaxing Incisions
Relaxing incisions can be made to the specimen before tissue embedding and microtome sectioning to help the tissue lie flat. A 15-blade scalpel can create superficial vertical or beveled incisions parallel to the tissue edge; these incisions should penetrate the epidermis and extend into only a portion of the dermis (see Image. Relaxing Incision).[1][2] A central relaxing "pac-man" incision may also aid in helping the edges lie flat even further.[2] Care should be taken not to cut the marginal surfaces, as this can disrupt the tissue's continuity and lead to confusion in margin orientation.[2] Cutting through the tissue may also distort the margins and result in lost tissue during processing. Additionally, introducing tissue lacerations near the edges may be mistaken for hash marks used to orient the specimen.[2]
When sectioning or making a relaxing incision, it is crucial to be aware of the potential for introducing floaters into the peripheral or deep margins, which could yield false positive results. Care should be taken to ensure a single, clean swipe is made, and the blade should be wiped after each cut to minimize the risk.[9]
Embedding, Freezing, and Mounting
After making relaxing incisions, the specimen is placed on a labeled glass slide with the margins facing down (in contact with the glass). This orientation allows for a clear view of the epidermal edges and deeper tissue, enabling the technician to manipulate the tissue (eg, using forceps or applying pressure with a gloved finger) to ensure that the peripheral and deep margins lie on the same plane without any air pockets.[1] This method, known as the "glass slide technique," is the most commonly used approach (see Image. Glass Slide Technique).[1] A cryogen, commonly liquid nitrogen delivered via a spray canister, can secure the tissue onto the slide, which is especially helpful for specimens that do not easily lie flat.[1]
Next, the tissue is covered with an embedding or tissue freezing medium, and the slide is placed on the Peltier plate in the cryostat machine to freeze both the tissue and the medium (see Image. Freezing Tissue in the Cryostat Machine). Peltier plates are thermoelectrically cooled surfaces found within the cryostat chamber.[10] Once the tissue begins to freeze, embedding media is applied to the stainless steel chuck, and the tissue is mounted onto the chuck with the epidermal surface facing down, in contact with the embedding media. The glass slide is then gently removed by warming it with a gloved hand, revealing the true surgical margin that will be sectioned.[1][10] Finally, additional embedding media is applied to the specimen for final freezing on the Peltier plate.[10]
When freezing tissue, the surgeon and technician should be aware of several potential issues. Tissue should be frozen quickly at approximately −22 °C; slow freezing can cause ice crystal formation, resulting in holes in the specimen.[1][2][10] If the tissue becomes too cold, it may chunk out of the block.[1] Notably, the tissues containing fat and cartilage require different processing methods to ensure high-quality frozen sections, as mentioned below.
- Adipose tissues: Specimens rich in adipose tissue should be chilled to −28 to −32 °C to prevent rips and tears during cryosectioning.[1][2][10] Additionally, adipose tissues take longer to freeze, which increases the risk of ice crystal formation. To facilitate faster freezing of fat, methods such as placing tissues on a Peltier plate set at −50 °C, flash freezing with an isopentane histobath, and using cooling spray such as liquid nitrogen can be used.[1][10]
- Cartilage: Specimens containing cartilage are optimally sectioned at higher temperatures, typically between -16 and -22 °C.[1]
Microtome Sectioning With a Cryostat (Cryosectioning)
Once the tissue is adequately frozen, the chuck is secured onto the specimen orientation head of the cryostat for cutting. Tissue is generally sectioned at a thickness of 5 to 6 µm using a microtome; thinner sections (eg, 4 µm) may be needed for periocular tissue and tissue requiring immunostaining, while thicker sections (eg, 6-10 µm) may be necessary for specimens with abundant fat.[1][2][10]
Tissue facing, which involves removing tissue from the true surgical margin with a microtome before sectioning, should be minimized.[1] Extensive tissue facing to obtain complete sections that include the entire margin can result in false positives, necessitating additional layers and potentially causing patient harm, increased time, and higher costs.[1] The glass slide technique for embedding can help avoid excessive tissue facing, as it allows the entire surgical margin to lie flat on a single plane before cryosectioning.[1]
During cryosectioning, technicians can use a camel hair paintbrush to guide the frozen tissue section onto the edge of the microtome blade.[1] The brush gently holds the tissue as it is being cut, helping to straighten out wrinkles and prevent folds (see Image. Paintbrush Technique in Cryosectioning).[1] Next, a warmed or slightly damp slide is used to attract and attach the tissue to the glass.[1] Any residual embedding medium around the specimen should be carefully wiped off. Sections should be placed on the slide in a defined order based on the surgeon's preference, with the same order used consistently to ensure the surgeon can accurately identify the true margin.[1]
Staining
Hematoxylin and eosin stain: H&E is the most commonly used stain in MMS.[11] Hematoxylin is a basic dye that stains acidic cellular components, such as nucleic acids (eg, DNA and RNA), glycosaminoglycans, and acidic glycoproteins, a bluish-purple color. Eosin, an acidic, negatively charged counterstain applied after hematoxylin, stains the cytoplasm of cells (eg, mitochondria and secretory granules) and collagen a pinkish-red color. While there are various H&E staining methods, 7 key steps are consistently followed—fixation, hydration, staining, blueing, counterstaining, dehydration, and clearing.[1][11] Tissues can be passed through an automated stainer or manually dipped into stains and reagents. Cartilage tends to separate from the glass during staining, but a positively charged slide can adhere to the negatively charged sulfates found in cartilage.[1]
Below is a step-by-step general staining protocol for H&E staining.[11]
- The specimen is fixed in 95% ethanol.
- The specimen is transferred to distilled water for hydration.
- Hematoxylin stain is applied to the specimen.
- The specimen is rinsed with distilled water to remove excess dye and reagents.
- Acid alcohol is used to eliminate excess hematoxylin.
- The specimen is rinsed with distilled water to halt the acid reaction and wash away any residue.
- A bluing reagent (e.g., Scott tap water) is applied.
- The specimen is rinsed with distilled water to remove any excess bluing agent.
- Eosin Y is used for counterstaining.
- The specimen is immersed in 95% ethanol to enhance shades of pink.
- The specimen is transferred to 100% ethanol.
- A clearing reagent (such as xylene, limonene, or an aliphatic solution) is used to remove any remaining alcohol and make the tissue translucent.
- A mounting medium and coverslip are applied.
Toluidine blue stain: Although toluidine blue staining is most commonly used for treating BCC, it can also be applied to SCC.[1][12] Toluidine blue is a cationic dye that possesses orthochromatic and metachromatic staining features. This dye appears blue (orthochromatic) when binding to nucleic acids and reddish-purple (metachromatic) when binding to mucin. BCC tumor islands stain blue, while the mucinous stroma stains pink, making it easier to distinguish the tumor from adnexal structures.[1][12] Notably, in SCC, toluidine blue produces a turquoise color.[12] Although toluidine blue staining is simpler and faster than H&E, it produces inferior nuclear details.[1]
Below is a step-by-step general staining protocol for toluidine blue staining.[12]
- The specimen is fixed in alcoholic formalin.
- The specimen is rinsed in running tap water.
- The specimen is stained with a 1% toluidine blue/1% sodium borate solution.
- The specimen is rinsed again in running tap water.
- The specimen undergoes dehydration in 70% ethanol.
- The specimen undergoes dehydration in 95% ethanol.
- The specimen undergoes dehydration in 100% ethanol.
- The specimen undergoes a second wash in 100% ethanol.
- A clearing agent is applied.
- A second wash with the clearing agent is performed.
- A mounting medium and coverslip are applied to the specimen.
Immunostaining
MART-1 is the most commonly used immunostain for detecting melanomas, particularly melanoma in situ or minimally invasive melanoma on the face, ears, hands, and feet.[5][13] This immunostain has high sensitivity and specificity for detecting melanomas on frozen sections and is regarded as the most effective single stain for interpreting melanomas, except for desmoplastic and spindle cell variants.[1][13][1] However, the staining process can be time-consuming and labor-intensive.[13]
Kimyai-Asadi et al developed a 20-minute protocol for MART-1 immunostaining, which involves the following steps:[14]
- Frozen sections are cut to 4 µm thickness.
- The sections are placed on a hot plate at 60 °C for 1 min.
- The slides are immediately fixed in acetone for 1 min.
- Sections are air-dried for 10-15 seconds.
- Sections are rehydrated in Tris-HCl buffer for 2 min.
- The slide is placed in a humidity chamber, and a protein block is applied for 1 min.
- The slide is blotted, and MART-1 antibody is applied for 5 min.
- The slide is swished gently in a Tris-HCl buffer for 10 seconds.
- Horseradish peroxidase is applied for 5 min.
- The slide is swished gently in a Tris-HCl buffer for 10 seconds.
- 3,3'-Diaminobenzidine chromogen is applied for 2 minutes.
- The slide is rinsed in water for 10 seconds.
- The slide is dipped in hematoxylin for 10 seconds.
- The slide is rinsed in running water.
- The slide is dipped in Scott bluing agent for 5 seconds.
- The slide is rinsed in running water.
- The slide is rinsed in 100% ethanol for 15 seconds.
- The slide is dried on a hot plate for 15 seconds.
- The slide is placed in xylene or a substitute for 30 seconds.
- A mounting medium is applied, and a coverslip is placed.
Other melanocyte immunostains, such as SOX10, Mel-5, S-100, and HMB-45, are less commonly used.[13] Cytokeratin immunostaining may be utilized for SCC and BCC to improve tumor detection; however, the additional time and cost associated with this stain make H&E a more practical choice.[1] If cytokeratin staining is performed, the most practical option is AE1/AE3, which targets both high- and low-molecular-weight cytokeratins and can identify both SCC and BCC.[1]
Complications
Troubleshooting common tissue processing errors can significantly improve slide quality and requires a fundamental understanding of how these errors occur.
Floaters
Floaters can be introduced during curettage, making nicks, cutting, and staining. To mitigate this issue, it is recommended to irrigate with saline after excision, maintain clean blades, and frequently change the staining solution.[2]
Folds on Edges
Folds on the edges often occur when working with a large single section. To mitigate this issue, it is advisable to bisect or divide larger specimens into multiple pieces before embedding, freezing, and cryosectioning.[1]
Rips and Tears in the Epidermis and Dermis
A nick in the microtome blade typically causes rips and tears in the epidermis and dermis.[1] The blade must be removed and replaced carefully to address this issue, as it is extremely sharp. An uneven layer of tissue may be excised if care is not taken. It is crucial to ensure that the specimen maintains a consistent thickness throughout.[1] Additionally, rips and tears can occur if the epidermis and dermis are too cold; most tissue should be cut at temperatures between −20 and −22 °C.[2]
Rips and Tears in Adipose Tissue
Inadequate freezing of fat before sectioning often leads to rips and tears. To address this issue, it is advisable to decrease the freezing temperature to between −28 and −32 °C, increase the freezing time, utilize a cryogen spray or histobath, or cut thicker sections (eg, 6-10 µm).[1][2][10]
Specimen Chunks Out of the Block
Tissue may become too cold during the cutting process. Most tissue should be cut at temperatures between −20 and −22 °C.[2] Cartilage, which can shatter at lower temperatures, is typically cut between −16 and −22 °C.[1]
Vacuoles and Clefts in the Section/Ice Crystal Formation
Vacuoles and clefts in the section may indicate that the tissue was frozen too slowly. To address this issue, technicians should consider freezing the tissue more rapidly by lowering the cryostat temperature and/or utilizing a Peltier plate, cryogen spray, or histobath.[1][2][10]
Chatter (Venetian Blind Effect)
Chatter, also known as the Venetian blind effect, is typically caused by a loose blade or chuck or inadequate lubrication.[1]
Accordion Folds
Accordion folds can occur if the cryostat is too warm or if the sectioning process is rushed.[1] Technicians should consider using a small camel-hair paintbrush to assist with cutting.
Dark Sections
Dark sections may result from cutting the tissue too thick, leading to excessive stain uptake. Aim for a general thickness of 4 to 10 µm, depending on the tissue type.[1] Additionally, issues during hematoxylin staining can contribute to this problem; it may be beneficial to decrease the concentration of hematoxylin, reduce the staining time, and increase the destaining time.[11]
The Tissue is Too Pink with Poor Staining of Cell Nuclei
This issue is likely due to weak hematoxylin staining. Increasing the staining time, decreasing the time in acid alcohol, changing the hematoxylin solution, adjusting the pH of the hematoxylin, and cutting thicker sections are recommended.[11] Inadequate fixation may also be a factor; thus, increasing the fixation time could be beneficial. Additionally, incomplete removal of alcohol can cause overly pink tissue with poor nuclear staining. Ensuring adequate rinsing in water before staining with hematoxylin is essential.
Eosin Bleeding
Inadequate clearing of alcohol can result in eosin bleeding or leaking from the tissue section. Increasing the time spent clearing the agent or changing the clearing agent is advisable.[11]
Water Beads, Blurry Spots, and Haziness
Water beads, blurry spots, and haziness are likely due to inadequate final dehydration. Using additional washes of absolute alcohol and extending wash times may help.[1][2] Insufficient clearing may also contribute; therefore, longer washes or a change in the clearing agent should be considered.[1]
Slides with bubbles
Bubbles on slides may result from an insufficient amount of mounting medium or poor mounting technique.[1] Care should be taken to avoid creating bubbles when applying the mounting medium and coverslipping. Using fingers or tweezers to gently press out the bubbles can help resolve this issue.[1]
Clinical Significance
Accurate interpretation of complete tissue margins on frozen sections is the hallmark of MMS and provides optimal cure rates and tissue preservation. Histological features of the tumor—such as margin status, perineural invasion, depth of invasion, cell type, tumor grade, and the presence of mitosis—directly impact clinical decision-making and patient outcomes. For instance, if margins are positive, additional layers of tissue are excised, and patients with SCCs showing perineural invasion may be referred to radiation oncology. Studies indicate that surgeon interpretation errors and tissue dropout or loss are significant contributors to tumor recurrence following MMS.[1] Therefore, producing high-quality frozen sections devoid of processing errors is paramount.
Inadequate tissue processing can result in artifacts, distortion of cellular features, or tissue loss, hindering the Mohs surgeon's ability to accurately evaluate the tumor's pathology. This can ultimately cause patient harm—such as unnecessary tissue removal due to false-positive margins or an increased risk of recurrence—prolonged surgery and processing times, more complex closures with higher complication risk, suboptimal postoperative management, and increased costs.[1][2]
Enhancing Healthcare Team Outcomes
MMS is a delicate and complex surgical procedure that requires multiple steps, the involvement of interprofessional healthcare team members (such as histology and surgical technicians), and precise communication and coordination. Proper tissue processing, including specimen preparation, cryosectioning, staining, and immunostaining, is essential for producing high-quality frozen sections and ensuring accurate histological interpretation of the entire surgical margin and tumor characteristics.
Effective communication between the surgeon and histology technician is essential for identifying processing errors and developing a collaborative approach to resolve them. This coordination minimizes interpretation errors, reduces the risk of patient harm, and ultimately improves patient care and outcomes.
Media
(Click Image to Enlarge)
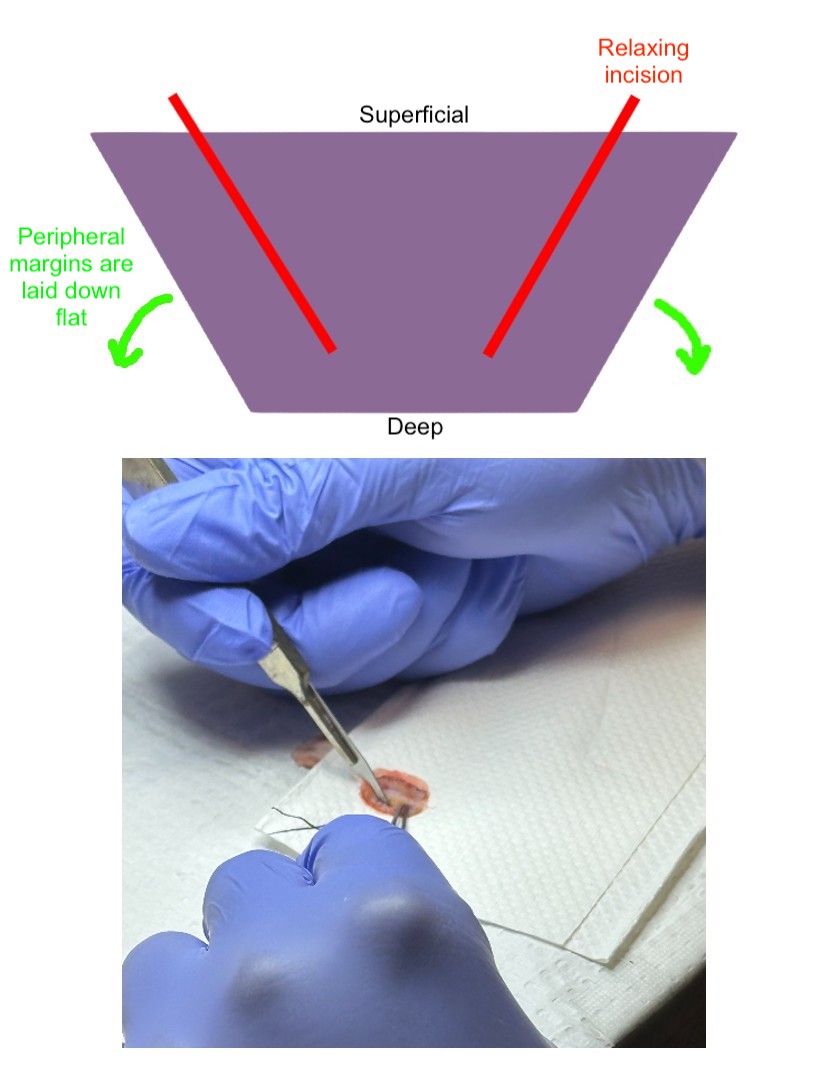
Relaxing Incision. A relaxing incision is made parallel to the wound edge to help the tissue lay flat, ensuring that the peripheral and deep margins align in a single plane for accurate sectioning.
Contributed by A Wong, DO
(Click Image to Enlarge)
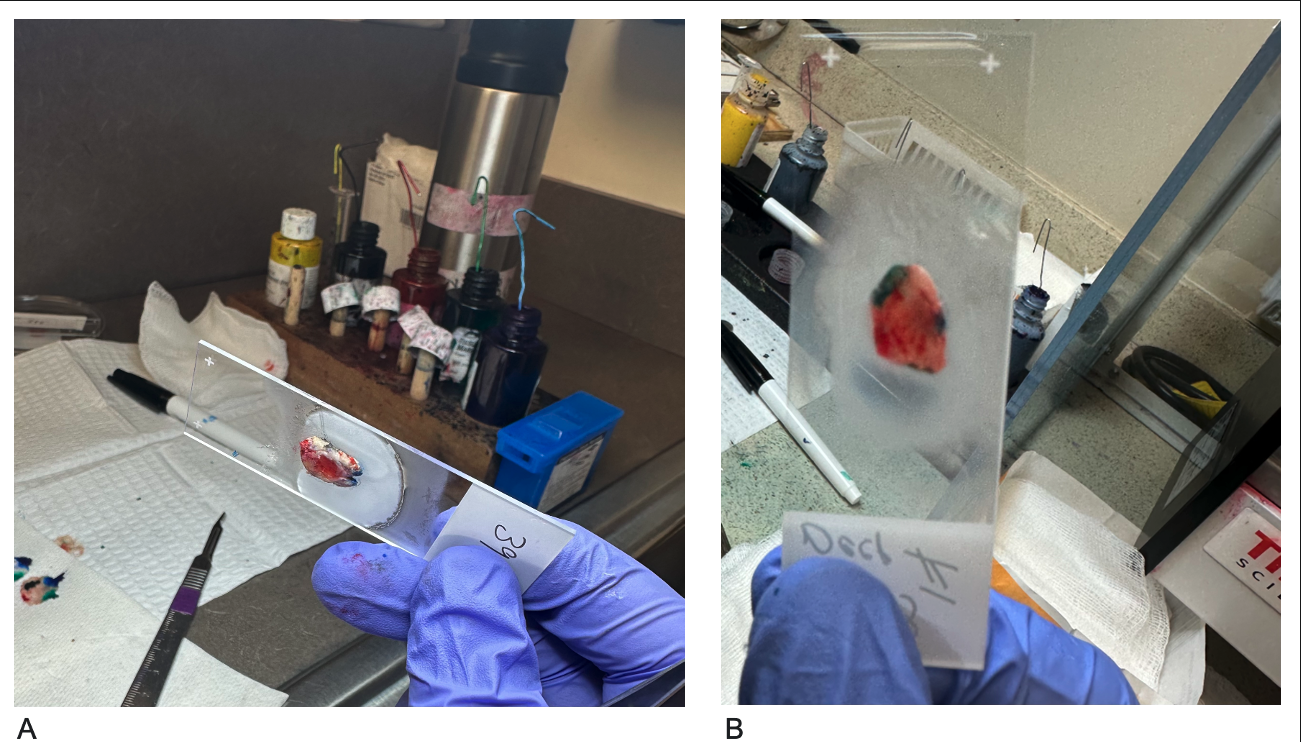
Glass Slide Technique. The tissue is positioned on the glass slide with the epidermis facing up and the deeper tissue in contact with the slide (A). The peripheral and deep margins are then adjusted to lie flat in the same plane. By viewing the slide from the bottom, the technician can ensure that both the deep and epidermal edges are aligned on the same plane without air pockets (B).
Contributed by A Wong, DO
(Click Image to Enlarge)
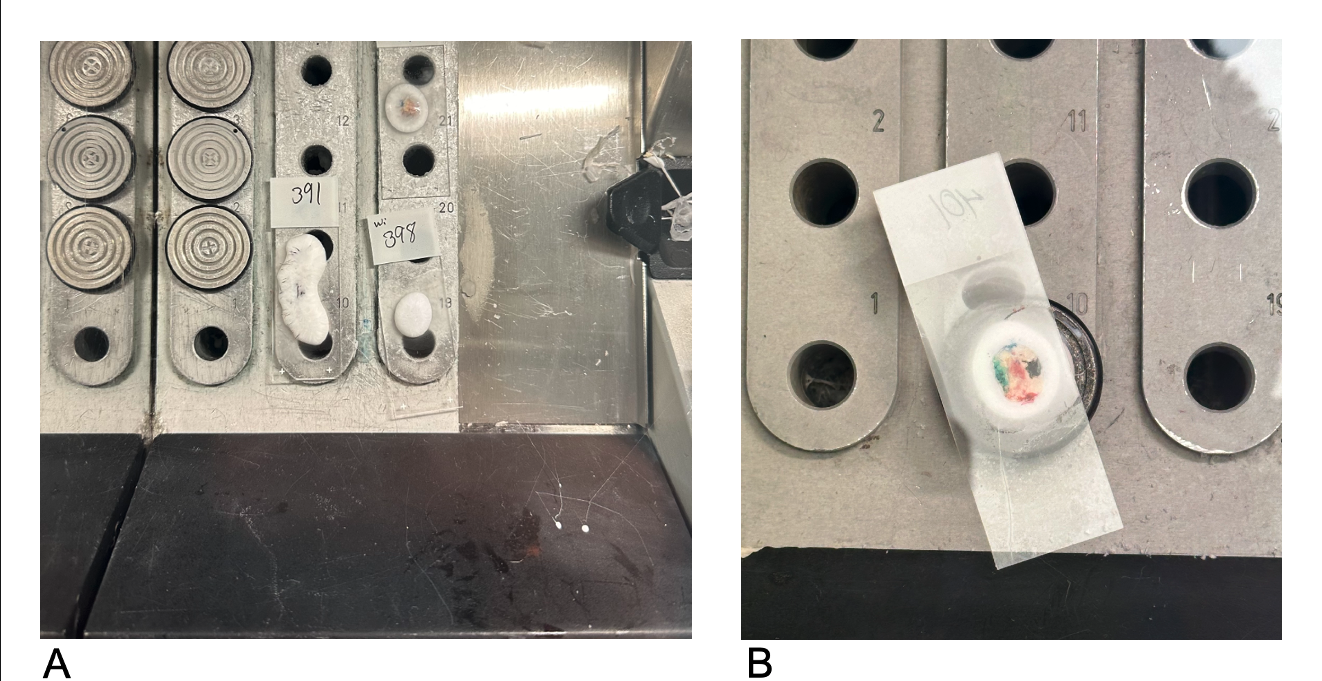
Freezing Tissue in the Cryostat Machine. Glass slides containing tissue and embedding media are frozen on the Peltier plate (A). The specimen can be attached after the embedding media is applied to the chuck's surface and allowed to freeze partially. The glass slide is then carefully removed by warming it with a gloved hand (not shown). The entire block remains on the Peltier plate until it is completely frozen solid (B).
Contributed by A Wong, DO
(Click Image to Enlarge)
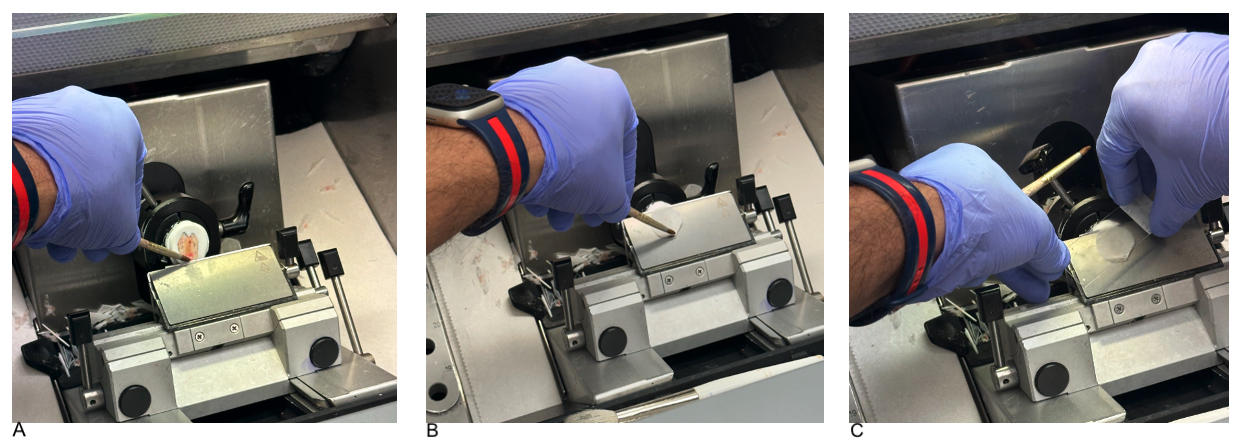
Paintbrush Technique in Cryosectioning. A small round-tip camel hair paintbrush is used to initiate the cutting of the tissue section onto the knife edge (A). The brush holds the tissue and guides it during cutting, thereby straightening wrinkles and preventing folds (B). A warmed slide attracts the frozen section, ensuring it adheres properly to the slide (C).
Contributed by A Wong, DO
References
Aslam A, Aasi SZ. Frozen-Section Tissue Processing in Mohs Surgery. Dermatologic surgery : official publication for American Society for Dermatologic Surgery [et al.]. 2019 Dec:45 Suppl 2():S57-S69. doi: 10.1097/DSS.0000000000002260. Epub [PubMed PMID: 31764292]
Bouzari N, Olbricht S. Histologic pitfalls in the Mohs technique. Dermatologic clinics. 2011 Apr:29(2):261-72, ix. doi: 10.1016/j.det.2011.01.002. Epub [PubMed PMID: 21421150]
Geers T, Humeda J, Brown TS. The Slide Review Protocol: Improving Patient Safety Outcomes in Mohs Micrographic Surgery. Dermatologic surgery : official publication for American Society for Dermatologic Surgery [et al.]. 2024 Apr 1:50(4):383-384. doi: 10.1097/DSS.0000000000004079. Epub 2024 Jan 30 [PubMed PMID: 38288961]
Russomanno K, Post ML, Deng M. Reducing Medical Errors During Mohs Frozen Sectioning. Dermatologic surgery : official publication for American Society for Dermatologic Surgery [et al.]. 2022 Mar 1:48(3):360-362. doi: 10.1097/DSS.0000000000003342. Epub [PubMed PMID: 35125437]
Etzkorn JR, Sobanko JF, Elenitsas R, Newman JG, Goldbach H, Shin TM, Miller CJ. Low recurrence rates for in situ and invasive melanomas using Mohs micrographic surgery with melanoma antigen recognized by T cells 1 (MART-1) immunostaining: tissue processing methodology to optimize pathologic staging and margin assessment. Journal of the American Academy of Dermatology. 2015 May:72(5):840-50. doi: 10.1016/j.jaad.2015.01.007. Epub 2015 Mar 13 [PubMed PMID: 25774012]
de Wet J, Plessis PJD, Schneider JW. Staged Excision of Lentigo Maligna of the Head and Neck: Assessing Surgical Excision Margins With Melan A, SOX10, and PRAME Immunohistochemistry. The American Journal of dermatopathology. 2023 Feb 1:45(2):107-112. doi: 10.1097/DAD.0000000000002354. Epub 2022 Dec 7 [PubMed PMID: 36669074]
Donaldson MR, Weber A. Dual Immunostaining With SOX10 and AE1/AE3 to Confirm Perineural Invasion on Mohs Sections. Journal of drugs in dermatology : JDD. 2019 Mar 1:18(3):262-264 [PubMed PMID: 30909330]
Krishnan RS, Donnelly HB. A better technique for taking Mohs sections involving cartilage. Dermatologic surgery : official publication for American Society for Dermatologic Surgery [et al.]. 2007 Jun:33(6):716-21 [PubMed PMID: 17550450]
Alam M, Shah AD, Ali S, Rauf M, Nodzenski M, Ibrahim O, Mohs Consensus Conference. Floaters in Mohs micrographic surgery. Dermatologic surgery : official publication for American Society for Dermatologic Surgery [et al.]. 2013 Sep:39(9):1317-22. doi: 10.1111/dsu.12258. Epub 2013 Jun 27 [PubMed PMID: 23809022]
Level 3 (low-level) evidenceHuerta T, Bailey A, Bergin J, Cook J. Optimal Preparation of Adipose Tissue in Frozen Sections for Mohs Micrographic Surgery. Dermatologic surgery : official publication for American Society for Dermatologic Surgery [et al.]. 2023 Mar 1:49(3):307-309. doi: 10.1097/DSS.0000000000003722. Epub [PubMed PMID: 36863040]
Larson K, Ho HH, Anumolu PL, Chen TM. Hematoxylin and eosin tissue stain in Mohs micrographic surgery: a review. Dermatologic surgery : official publication for American Society for Dermatologic Surgery [et al.]. 2011 Aug:37(8):1089-99. doi: 10.1111/j.1524-4725.2011.02051.x. Epub 2011 Jun 2 [PubMed PMID: 21635628]
Todd MM, Lee JW, Marks VJ. Rapid toluidine blue stain for Mohs' micrographic surgery. Dermatologic surgery : official publication for American Society for Dermatologic Surgery [et al.]. 2005 Feb:31(2):244-5 [PubMed PMID: 15762224]
Elgash M, Young J, White K, Leitenberger J, Bar A. An Update and Review of Clinical Outcomes Using Immunohistochemical Stains in Mohs Micrographic Surgery for Melanoma. Dermatologic surgery : official publication for American Society for Dermatologic Surgery [et al.]. 2024 Jan 1:50(1):9-15. doi: 10.1097/DSS.0000000000003945. Epub 2023 Sep 18 [PubMed PMID: 37738278]
Level 2 (mid-level) evidenceKimyai-Asadi A, Ayala GB, Goldberg LH, Vujevich J, Jih MH. The 20-minute rapid MART-1 immunostain for malignant melanoma frozen sections. Dermatologic surgery : official publication for American Society for Dermatologic Surgery [et al.]. 2008 Apr:34(4):498-500. doi: 10.1111/j.1524-4725.2007.34095.x. Epub 2008 Jan 31 [PubMed PMID: 18248466]