Continuing Education Activity
Dermabrasion involves the use of abrasive materials to induce epidermal and dermal injury, resulting in the improvement of the appearance of the skin following wound healing. Dermabrasion is a surgical procedure performed to improve the appearance of rhytides, lentigines, and scars on the skin. This activity reviews the technique, indications, and contraindications for the procedure and highlights the role of the interprofessional team in evaluating and treating patients who undergo dermabrasion.
Objectives:
- Identify the indications for using dermabrasion.
- Describe the equipment and technique to perform dermabrasion.
- Review the potential complications of dermabrasion.
- Explain the importance of collaboration and communication amongst the interprofessional team to improve outcomes for patients undergoing dermabrasion.
Introduction
Dermabrasion involves the use of abrasive materials to induce epidermal and dermal injury, resulting in the improvement of the appearance of the skin following wound healing.
Anatomy and Physiology
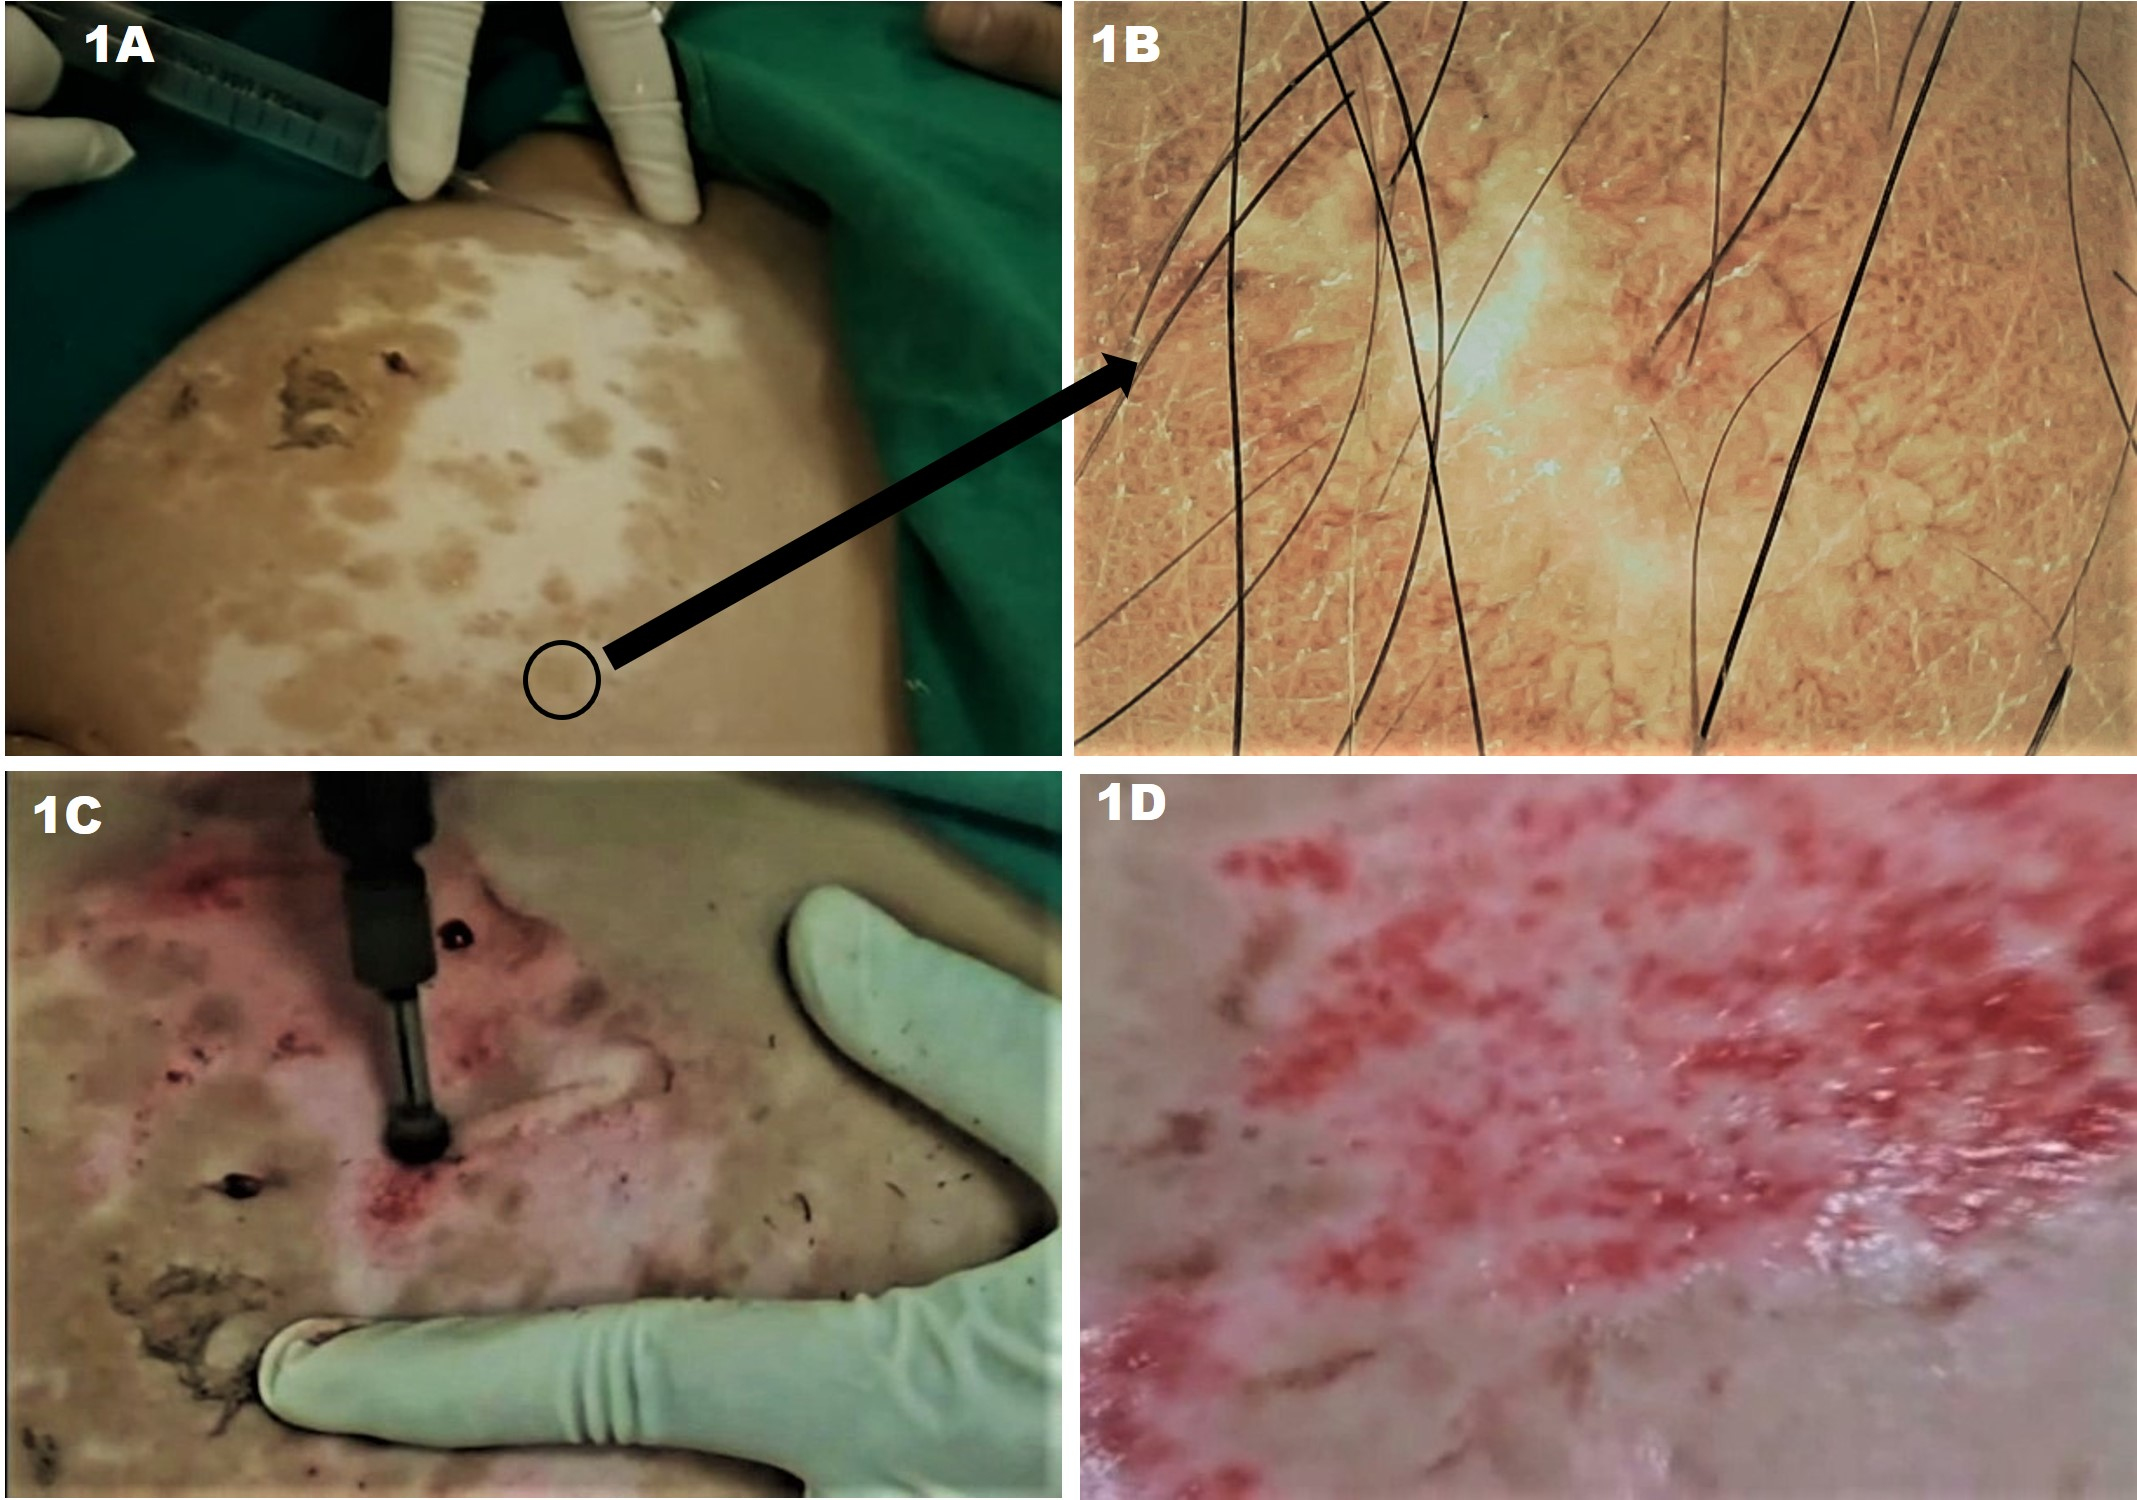
The skin is divided into two layers: the epidermis and the dermis. From superficial to deep, the epidermis is composed of the stratum corneum, stratum lucidum (in acral areas), stratum granulosum, stratum spinosum, and stratum basale. The dermis is subdivided into the more superficial papillary dermis and deeper reticular dermis. To safely perform dermabrasion, the surgeon must be familiar with the appearance of each of these layers. The papillary dermis has a rich vascular supply; pinpoint bleeding is observed upon abrasion of this layer. The reticular dermis is made up of large collagen bundles, which appear as yellow parallel fibers superficially, and frayed white fibers in the deeper reticular dermis.[1][2][3][4]
Dermabrasion can be safely performed to the level of the superficial or mid-reticular dermis. Dermabrasion of tissue beyond this level significantly increases the risk of adverse events, such as scarring and dyspigmentation.[1][2] Hair follicles and sebaceous glands rooted in the dermis are crucial to the regeneration of the abraded dermis and epidermis.[5] Ablation of skin down to the dermis disrupts the collagenous infrastructure, increasing fibroblast activity and resulting in the formation of new collagen type I, dermal remodeling, and clinical improvement in the appearance of the skin.[1][2][4]
Indications
Dermabrasion can be used to treat lentigines, actinic keratoses, acne scars, rhinophyma, and rhytides. It can also be used for scar revision following excision or Mohs surgery, typically six to ten weeks following the procedure.[1][6][7][8]
Because dermabrasion ablates skin to the mid-dermis, conditions involving structures at or above this level in the skin are typically amenable to treatment with dermabrasion. Manual dermabrasion is best used for the treatment of smaller areas and more delicate skin and for the blending of resurfaced skin into adjacent untreated skin.[2][9]
Contraindications
Patients with active herpes simplex virus (HSV) infection should not be treated with dermabrasion. The infection should be dormant for at least six to eight weeks prior to the procedure. Patients with a history of HSV should be prophylactically treated with antiviral medication, such as acyclovir or valacyclovir, from two days prior to two weeks after the procedure. It has been suggested that all patients should receive antiviral prophylaxis prior to dermabrasion.[2][10]
Patients on isotretinoin or who have been treated with isotretinoin in the previous six months are historically considered poor candidates for dermabrasion. Atrophy of the pilosebaceous unit induced by isotretinoin may increase wound healing time.[5] Isotretinoin also increases the risk of hypertrophic or keloid scar formation. Patients should ideally be off isotretinoin for one year prior to treatment with dermabrasion.[11][8][3] More recent research indicates that manual or microdermabrasion may be safer in the context of recent or current isotretinoin use; an informed discussed should be had with each patient on a case-by-case basis.[12] Active acne is a relative contraindication to dermabrasion as it may predispose to postoperative infection.[3][11]
Dermabrasion is safest in patients with Fitzpatrick skin types I and II. Fitzpatrick skin types III and higher are at increased risk of postoperative hyper- or hypopigmentation. The risk of dyspigmentation must be weighed against the potential benefit that may be achieved. A 2-week to 4-week course of topical 4% hydroquinone may decrease the risk of dyspigmentation following the procedure.[2]
Equipment
Dermabrasion is most often performed with portable hand-held dermabraders with a diamond fraise, wire brush, or serrated wheel attached. The handpieces may be powered by pneumatic or elective motors and are often controlled by a foot pedal. These devices are attached to a unit that controls the rotational speed of the endpiece. They are typically capable of rotation from 10,000 to 85,000 revolutions per minute (RPM), but dermabrasion usually takes place in the range of 12,000 to 15,000 RPM. The amount of pressure applied to the skin and rotational speed are the two key factors determining the depth of penetration. At increased speeds, the abrasive force is stronger, and less pressure is needed to achieve a certain depth of injury.[3][2][1]
Diamond fraises are industrial diamond chip-studded tips made in a variety of shapes, including cone, cylinder, wheel, bullet, and pear. The grit is variable, with finer fraises suited for dermabrasion of small areas, delicate skin, or superficial scars and coarser fraises preferred for deep scars and full-face dermabrasion.[13][1][8] Diamond fraises abrade the skin through frictional injury. The diamond projections are very small, minimizing the risk of penetrating too deeply in the skin as long as the tool is handled properly.[2] Diamond fraises are easier to control than wire brushes, making them more suitable for novice surgeons.[8][1]
Rotary wire brush tips consist of 2-3 mm wires protruding from a central cylinder. They are available in a wide range of sizes, shapes, and coarseness. In contrast to diamond fraises, these induce injury by the production of microlacerations in the skin.[14] They can penetrate the skin with even mild pressure, and therefore speeds greater than 25,000 RPM are not advised.[15][2]
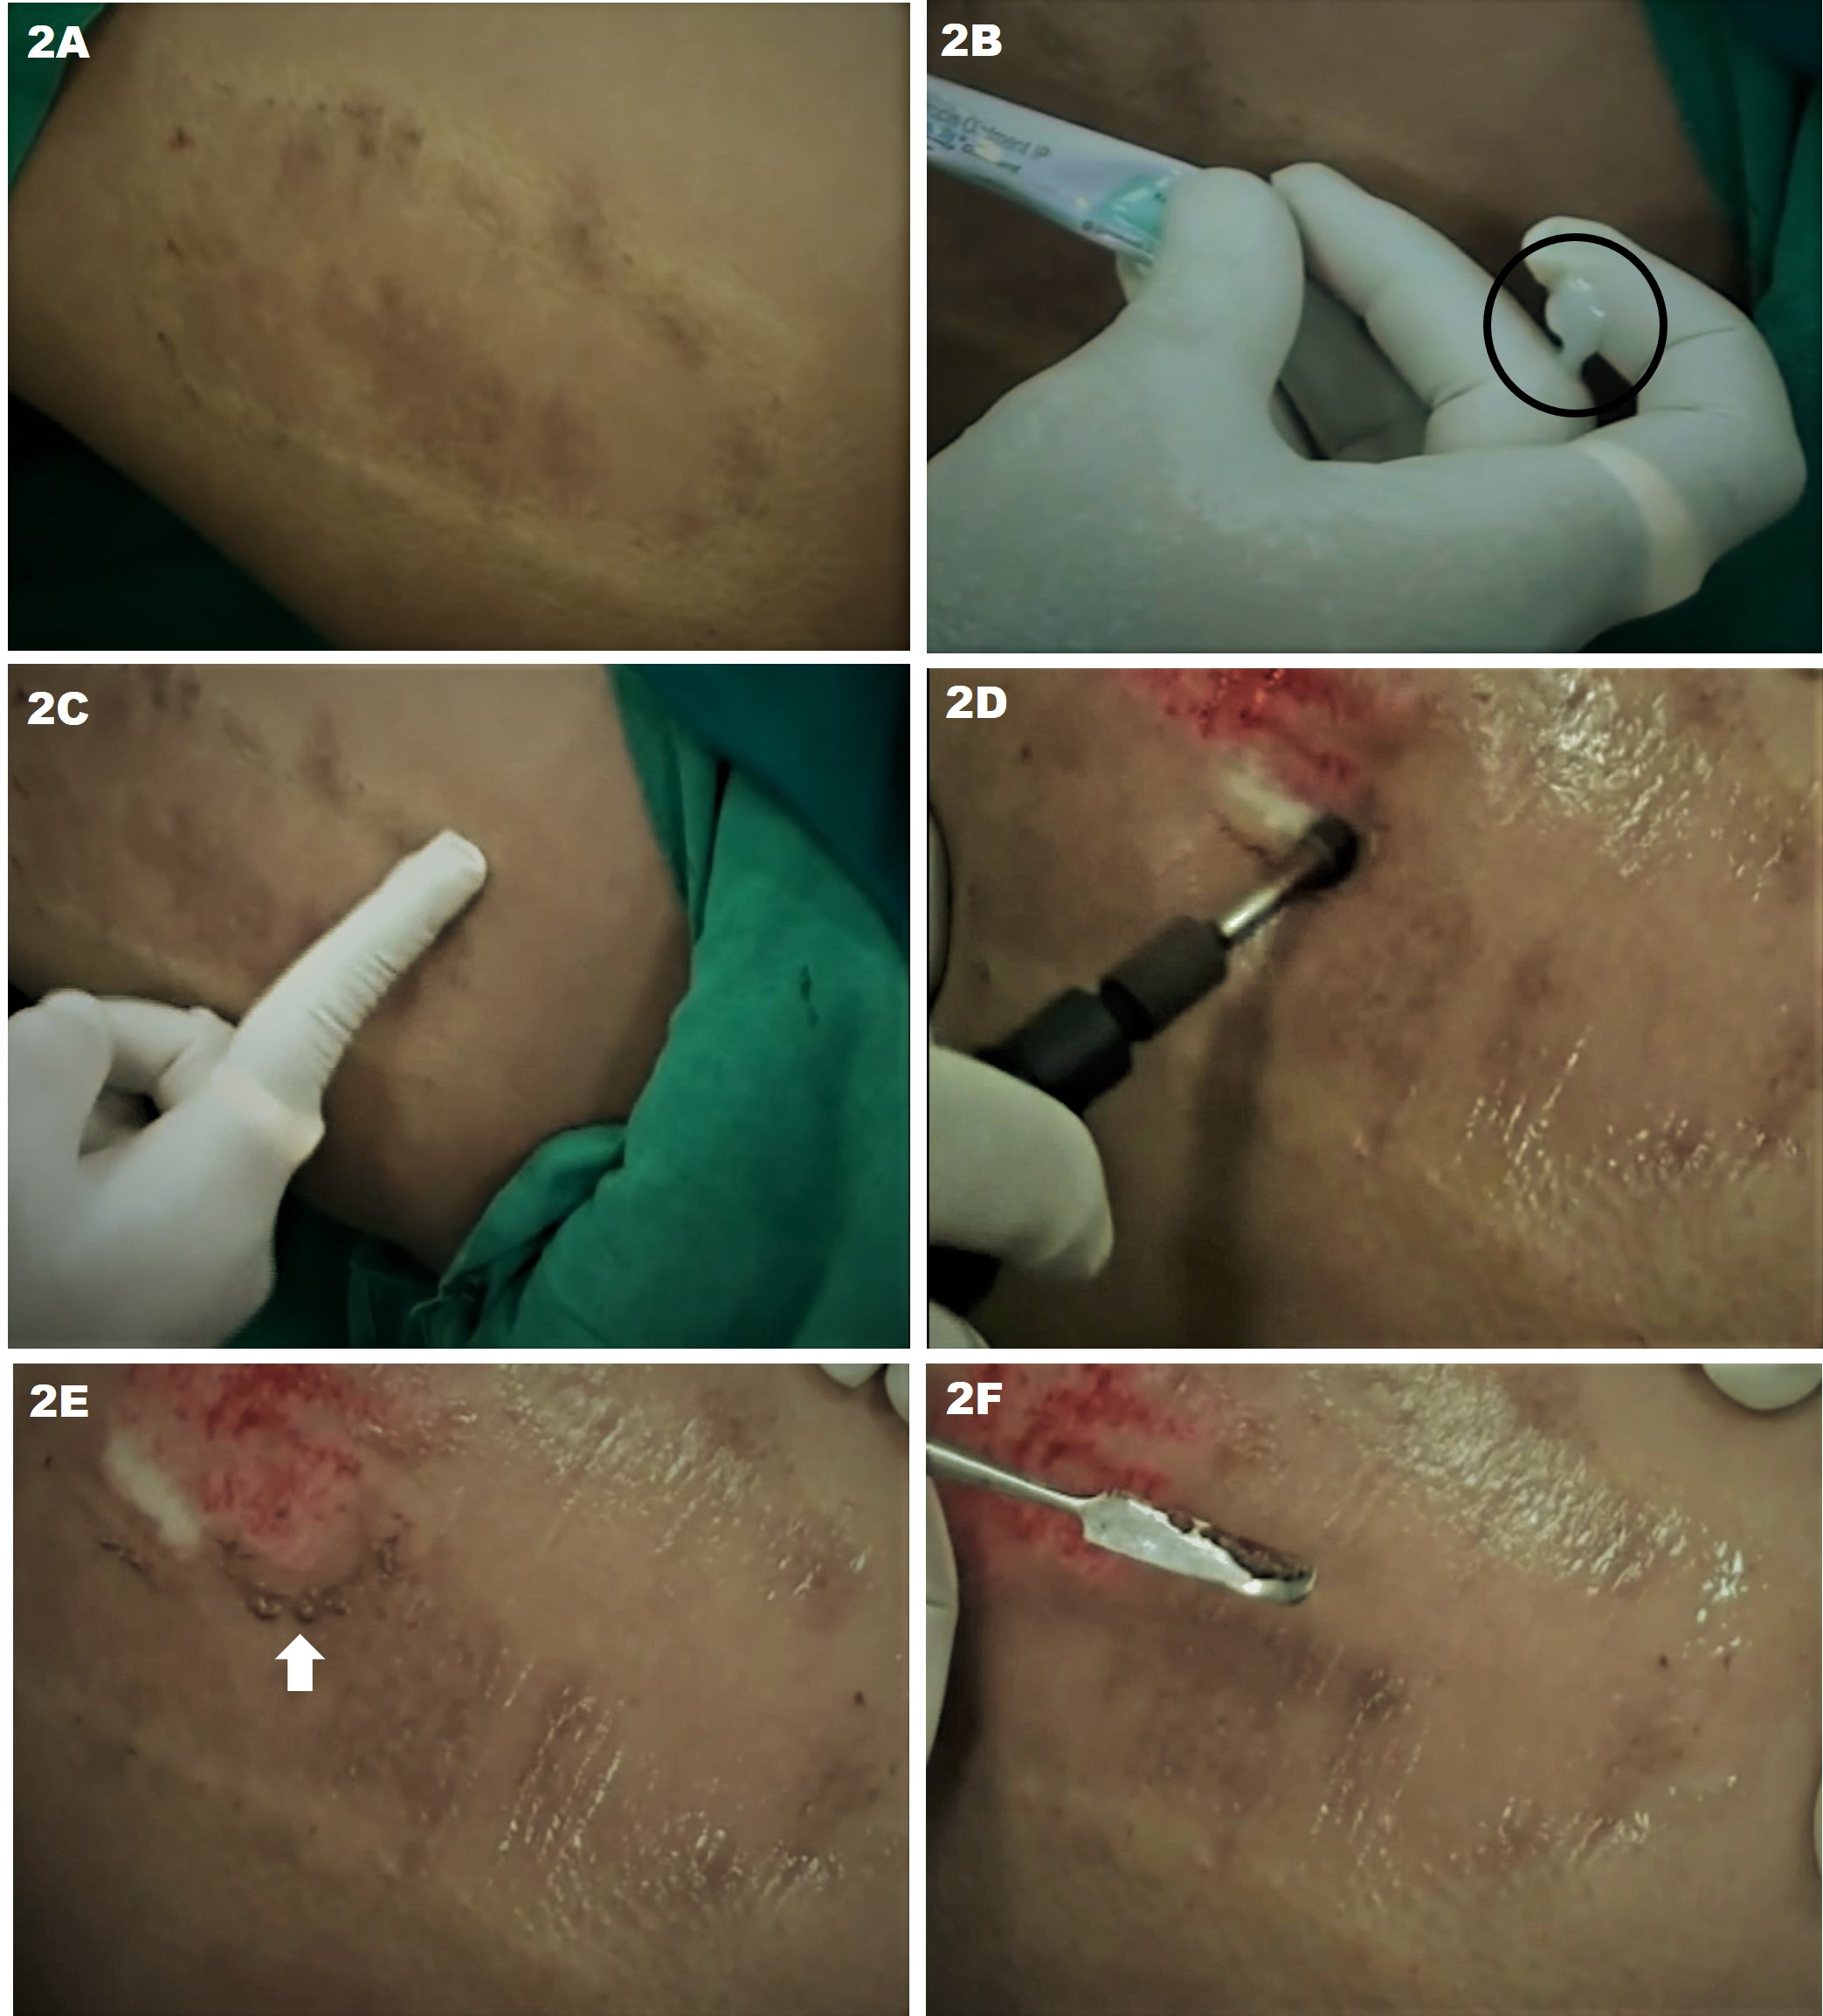
Manual dermabrasion with sterile sandpaper or drywall sanding screen may be employed for the treatment of more localized areas, such as scar revision.[7]
Personnel
Dermabrasion is best performed with the assistance of at least one surgical assistant to pull the skin taught and help control bleeding.
Preparation
Proper patient selection and setting realistic patient expectations are paramount to the success of dermabrasion. Patients should be screened for a history of isotretinoin use, history of hypertrophic or keloid scar formation, blood thinner use or coagulopathy, history of HSV infection, prolonged steroid use, and history of HIV or hepatitis C.[2][8][3][1] All patients with a history herpes simplex virus (HSV) should be placed on antiviral prophylaxis prior to the procedure; some surgeons advocate for giving every patient antiviral prophylaxis prior to the procedure.[10]
Strict photoprotection should be advised for two months leading up to the procedure to minimize the risk of dyspigmentation. The initiation of topical hydroquinone a few weeks prior to the procedure also decreases this risk. A topical retinoid regimen is often started at least one month prior to dermabrasion to increase the speed of wound healing and new collagen formation.[3][2][16][1][4]
Technique or Treatment
Local or general anesthesia may be employed to maximize patient comfort during dermabrasion. Regional dermabrasion may be facilitated by localized anesthesia injection or nerve blocks. Full facial dermabrasion may be performed with tumescent anesthesia, intravenous sedation, or general anesthesia. The area to be treated should be prepared with an ophthalmologically safe cleanser such as povidone-iodine. The surgeon and assistants should wear sterile masks, shields, and gloves as protection from blood and other aerosolized particles.[1][3][2]
The area to be treated is next marked out, and the dermabrasion tip of choice is attached to the handpiece. One anatomic unit is treated at a time. The skin to be treated must be held taut by either one hand or an assistant as the dermabrader is moved across it with uniform, gentle pressure. Diamond fraise tips are moved back-and-forth, while wire brushes are moved unidirectionally.[3][8][2]
Proper manipulation, pressure, and control of the dermabrader are crucial in preventing adverse outcomes. Numerous techniques exist, and each surgeon must find the one that works best for them. The device may be held like a pencil or like a spatula. The pencil grip may predispose slightly more to beveling of the device. Treatment patterns that may be used include back and forth, left to right, opposing right angles, and superior to inferior. Movement of the device across the skin perpendicular to the direction of fraise rotation maximizes control of the tip. Facial subunits should be treated in succession with feathering at the lateral edges to prevent a clear demarcation between treated and untreated skin (such as at the hairline and mandible). Extra care must be taken in areas of loose skin, such as the eyelids, lips, and nasal ala.[1][5][3][4]
Dermabrasion to the proper layer of the skin is crucial to achieving a cosmetically appealing result with minimal risk of adverse side effects. The entrance into the papillary dermis is evidenced by the presence of pinpoint bleeding. Ideally, treatment penetrates to the superficial or mid-reticular dermis where more confluent bleeding is observed. The superficial reticular dermis is characterized by parallel yellow chamois colored strands of collagen; frayed white strands are evident in the deep reticular dermis. Dermabrasion into the deep reticular dermis should be avoided due to an increased risk of scarring.[1][3][4]
In smaller areas to be treated with manual dermabrasion, the area is sterilized with chlorhexidine or other antiseptic solution and then injected with a local anesthetic. Sterile sandpaper (or abrasive material of choice) can be wrapped around the surgeon’s finger, syringe, or another round object. Gentle abrasion in a circular and/or back-and-forth motion is performed until pinpoint bleeding is observed. The grit of the material used, the force of application, and the duration of abrasion all affect the depth of penetration.[7][9]
Following dermabrasion, saline-soaked gauze may be applied to the treated area. An occlusive ointment is applied to the skin to prevent infection and maintain a moist environment for wound healing. The dressing should be changed daily with a gentle cleansing of the area and re-application of ointment. Some surgeons recommend daily dilute acetic acid soaks. Erythema, edema, and crusting are expected. Topical steroids are occasionally prescribed to decrease inflammation. Re-epithelialization is typically complete within one to two weeks. Granulation tissue present beyond postoperative day 10 is a sign of delayed healing and may be a result of infection, contact dermatitis, or other systemic factors; evaluation is necessary. Erythema may take up to two months to resolve. Rigorous photoprotection is imperative to decrease the risk of dyspigmentation; hydroquinone may be used for the prevention or treatment of hyperpigmentation.[3][8][2][1][17][4]
Complications
Complications resulting from dermabrasion include infection, scarring, dyspigmentation, milia, and persistent erythema. Postoperative infections are most commonly caused by Staphylococcus aureus, HSV, or Candida. Staphylococcal infections usually present in the first 48 to 72 hours with honey-colored crust, edema, and erythema. Topical or oral antibiotics may be prescribed depending on the severity. HSV infection also usually presents within 48 to 72 hours, usually with significantly more pain than would be expected following the procedure. Acyclovir or valacyclovir should be initiated promptly. Candida infection usually presents five to seven days following the procedure with delayed healing, exudates, edema, and/or itching. Topical or oral antifungals should be prescribed.[1][8][4]
Scarring is most commonly observed when dermabrasion is performed deeper than the mid-reticular dermis, although patients with a genetic predisposition to scarring are at an increased risk at any depth. Patients with Fitzpatrick skin types III or higher have an increased risk of dyspigmentation following the procedure. Proper patient selection, strict photoprotection, and treatment with hydroquinone can help mitigate this risk. Milia formation is not uncommon. They may regress spontaneously or can be treated with manual extraction, topical retinoids, or electrodesiccation.[8][3][2][1]
Clinical Significance
Dermabrasion is a cosmetic procedure that results in clinically and statistically significant improvement in the appearance of rhytides, lentigines, actinic keratoses, and scars. The mechanical resurfacing of the skin induces dermal collagen remodeling and formation, resulting in clinical and histologic improvement in skin integrity and appearance.[1]
Enhancing Healthcare Team Outcomes
An interprofessional team that provides a consistent and integrated approach to patient counseling, procedure technique, and postoperative care can help achieve optimal outcomes. Pre-procedure screening and counseling of patients may be performed primarily by the surgeon, but all healthcare team members should be able to recognize contraindications to the procedure and answer patient questions correctly. The surgeon and all assistants must be knowledgeable about proper personal protective equipment and dermabrasion technique for maximum provider and patient safety. All team members must be able to recognize early signs of complications to allow for timely implementation of treatment and optimization of outcomes.